Akka : Testing your Actors

Introduction

Akka is a great Scala and Java framework implementing the “Actor” programming model. It allows developers to easily build concurrent systems.

The main ideas behind the Actor model are:

  • The work is divided into small tasks
  • An Actor is responsible for executing one task
  • Actors communicate between each other asynchronously by sending messages

Akka takes care of the Actors lifecycle, execution scheduling and communication.

The only possible interactions with an Actor are sending messages and receiving back other messages. As the actor’s execution is made asynchronously, it can be hard to test without proper tools. Fortunately, Akka comes with a set of testing tools, the “TestKit”, that come handy when dealing with actors testing.

TestKit library

To use the Akka Testkit, you just have to add a dependency on it (usually for the “test” scope). In a classical SBT configuration, it should look as follow :

libraryDependencies += "com.typesafe.akka" %% "akka-testkit" % "2.1.4" % "test"

After reloading the SBT configuration, all the TestKit tools should be available in your project.

The TestKit class

One of the main tool provided by Akka Testkit is the TestKit class. Your test class can extend it and provide an ActorSystem and this system will be available implicitely in all your test cases. Note that you can also use the TestKitBase trait if you need a trait instead of a class.

class BasicTest extends TestKit(ActorSystem("testSystem"))
  with WordSpec
  with MustMatchers {
  ...
}

This implicit Akka System will be used by the other Testkit tools and will allow to keep your code as simple as possible.

The TestActorRef class

The asynchronous model using by Akka can make it difficult to test. One can quickly have to do some complicated code with waits, timeouts,…

Fortunately, Akka Testkit comes with the TestActorRef class.

When you create an Actor with the TestActorRef, it will use a special message dispatcher called CallingThreadDispatcher that will execute the actor receive() method in the same thread it has been sent. Therefore, all your tell() calls will become synchronous and more easily testable.

In addition to making the actor message processing synchronous, the TestActorRef will give back a special ActorRef instance that allows you to access the underlying actor instance (which is not possible with standard Akka actors). It allows you to make assertions about some of the actor’s internal states.

Here is a sample code showing this usage :

The ImplicitSender trait

If you want to test an actor by sending him a message and expecting that it has replied to the sender, you can use the ImplicitSender trait. This trait will define an implicit ActorRef to a fake Actor and this ActorRef will be used automatically as the sender when you use the tell() (or !) method.

You can then use the expectMsg…() method available through the TestKit class to check wheter this fake actor has received any message.

The TestKit class provide a lot of different variants of the expectMsg…() method : expectMsgClass(), expectMsgAnyOf(), expectMsgAllOf(), expectNoMsg(),…

To be continued

We went through the basic mechanisms provided by Akka Testkit to allow easy testing of your actors. You can find additional information on the section dedicated to testing in the Akka Documentation.

Next time, we will go through more advanced actors testing techniques with the use of TestProbe and AutoPilot.

Développement web , , ,

Ebean and the OptimisticLockException

I encountered today a strange Exception with PlayFramework 2.0 / Ebean when updating an entity:

javax.persistence.OptimisticLockException: Data has changed. updated [0] rows

At first sight, this exception is quite cryptic and it took me some time to understand why it was thrown and how to get rid of it.

What is optimistic locking ?

Optimistic locking is used when you don’t want to lock your data between the time you read it and the time you update it. It is based on the hypothesis that the value will probably not change in the database between reading and updating.

The benefit of using optimistic over pessimistic locking is that it does not require any lock on the database.

How Ebean manage optimisic locking ?

To understand the OptimisticLockingException, we need to dive into Ebean’s internals and look at how it handles optimistic locking.

Ebean has 2 strategies to manage optimistic locking (More info). The default strategy is called “All Column”. When Ebean executes an UPDATE SQL statement, it will include in the WHERE clause all the values it has read when retrieving the entity.

For example :

When retrieving a user like this

User user = User.find.byId(1)

The SQL statement will be something like

SELECT id, name, age FROM user WHERE id = 1

Let’s say it returns : 1, 'John', 25

If you update your entity and save it

user.setAge(26)
user.save()

The SQL statement will be something like

UPDATE user SET age = 26 WHERE id = 1 AND name = 'John' AND age = 25

This update statement will ensure that nobody has modified this data in the database since the entity has been retrieved. Ebean will then check if the number of records affected by this statement is 1 and if it’s 0, it means the data has been altered and it will throw the OptimisticLockException. That’s why you can see updated [0] rows in the Exception message.

Most of the time, this works well. It will succeed if the data has not been modified and fail if the data has been modified.

However sometimes it can fail even if the data has not been modified. This can happens for example if you have a column with type double and data containing a lot of decimals. It can happen that you retrieve in your Java code something like 0.46712538003907 but in fact, in the database, the data stored is something like 0.467125380039068. When updating, the Java value will be included in the WHERE clause and, as it doesn’t match the value stored in the database, the update will fail.

The solution

The easiest solution in this case is to use Ebean’s other strategy for managing optimistic locking. This second strategy is called “Version column”. For that, you can create a field in your entity that will be used to maintain its “version”. This field should have the @Version annotation. For example:

public class User extends Model {
    …
    @Version
    public Timestamp lastUpdate;
    …
}

In this case, Ebean will use this column in the WHERE clause of the UPDATE statement:

UPDATE user SET age = 26 WHERE last_update = '2012-11-08 15:00:40'

With that @Version column, everything will always work as expected !

Développement web , , ,

Contrôler l’ordre d’exécution des hooks dans Drupal

Contexte

Drupal et son mécanisme de hook permet de modifier le comportement par défaut du core ou d’autres modules depuis ses propres modules.

Pour chaque appel à une fonction hookable Drupal va rechercher dans tous les modules activés si ce module implémente ou non ce hook. Si un ou des modules implémentent le hook, Drupal va automatiquement les appeler.

Dans la majorité des cas, tout se passe bien, mais il arrive qu’on ait besoin de contrôler l’ordre d’exécution de ces hooks. Par exemple, lorsqu’un module A ajoute une fonctionnalité via un hook et qu’on souhaite modifier cet ajout dans un autre module B. Dans ce cas, il faut impérativement que le hook du module B soit appelé après celui du module A.

Continue reading

Développement web ,

Play Framework 2.0 – Premières impressions

Cet article à été publié sur le blog de Clever Age.

Vous pouvez le retrouver à cette adresse.

Développement web , , ,

Unit testing tricks for Play 2.0 and Ebean

Basic Ebean model testing

When you want to execute some tests that interact with your Models, you need to use a Play FakeApplication. This is described in the Java section of the Play 2.0 documentation.

Here is how the code looks like :

As you can see, there is a lot of boilerplate code that we would like to avoid.

The easiest solution is to create a Test base class that will create de FakeApplication using a method annotated with @BeforeClass

Here is how the code could look like for the base class :

public class BaseModelTest {
  public static FakeApplication app;

  @BeforeClass
  public static void startApp() {
    app = Helpers.fakeApplication(Helpers.inMemoryDatabase());
    Helpers.start(app);
  }

  @AfterClass
  public static void stopApp() {
    Helpers.stop(app);
  }
}

You can then code your tests like this :

Database cleaning

To keep my tests really independent of each other, I systematically clean the database before each test.

One solution to achieve that is to create a new FakeApplication before each test. This can be done by replacing the @BeforeClass / @AfterClass annotations with @Before / @After and removing the static keyword in the methods’ declarations.

It will work well but unfortunately, this will have a bad impact on the execution time. It can be ok if you only have a few tests, but when the number of tests will grow, it can become problematic. It would be nice to find a more efficient solution.

To avoid creating a FakeApplication for each test, we could just execute directely some drop table and create table SQL scripts. This should be faster.

I found an easy way to do that by reusing the evolution script generated by the EbeanPlugin class. Here is how we can do this :

Now before each test, you automatically have a database cleaned very quickly !

Here is a sample app illustrating this code : https://github.com/mguillermin/play2-ebean-testing

Note that if you have disabled evolutions, you will probably have to hack a little bit more to generate the create and drop scripts directly from Ebean. This is what is done in the EbeanPlugin.onStart() method.

IDE integration

Once you’ve correctly made your tests work with the FakeApplication, you might want to launch them directly from your IDE.

Why ?

Launching all your tests is easy with the command line. But when you want to launch a specific test class or method, it’s usually easier to use directly your IDE. You can then precisely select which tests to run, launch them in debug mode,…

The problem

If you try to do this on a test that use an Ebean entity, it will fail. Here is an example of what you will get :

java.lang.IllegalStateException: Class [class play.db.ebean.Model] is 
enhanced and [class models.Company] is not - (you can not mix!!)

The problem is that your Model class is not enhanced by Ebean when you don’t launch your test from the Play console.

First solution : javaagent

Reading the Ebean reference guide , I found a way to automatically enhance your classes by using a specific javaagent.

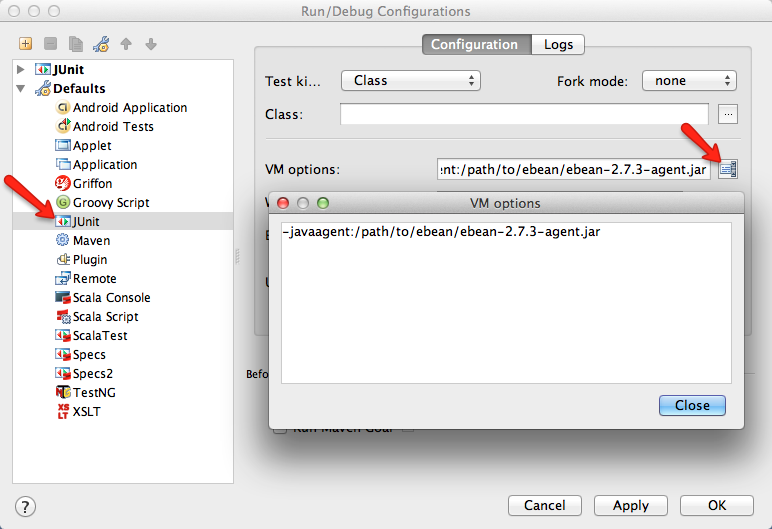
All you have to do is to download Ebean, unzip it and then configure your IDE to add a JVM argument when launching the tests.

Here is how to do that with IntelliJ :

  • Go to the ‘Run’ / ‘Edit Configurations’ menu
  • Find the JUnit configuration under “Defaults”
  • Fill the ‘VM Options’ field with :
    -javaagent:/path/to/ebean/ebean-2.7.3-agent.jar
    

Play / Ebean / IntelliJ configuration

You can then enjoy running tests from your IDE.

Second solution : IDE plugin

If you use IntelliJ, there is an easier solution to enable enhancement automatically on your model classes. You will find in the plugin repository the Ebean weaver plugin that will do exactly what we want.

You just have to install it, restart, check the ‘Build’ / ‘Ebean weaving’ menu and that’s all.

Note that such a plugin exists also for Eclipse.

Conclusion

I hope that with these small tips and tricks, you will be able to enjoy even more discovering Play 2.0.

Développement web , , , ,

Appels asynchrones avec Play Framework

L’intégration de nouveaux composants permettant la gestion des appels asynchrones dans Play Framework a été récemment annoncé sur la mailing-list par Guillaume Bort. Ils ne sont pour l’instant pas disponible sur la version stable de Play, il faut donc récupérer la branche master pour les utiliser. En voici un rapide aperçu avec un exemple d’utilisation.

En résumé

Intégrés dans la librairie F ( play.libs.F ), ces nouveaux composants offrent, entre autre, la possibilité de mettre en pause une action jusqu’à ce qu’un événement se produise.

Lorsqu’on souhaite implémenter ce type de fonctionnalité, un problème se pose généralement : comme chaque requête est servie par un thread, si on suspend de manière simpliste les threads, on ne pourra pas avoir un nombre de clients supérieur au nombre de threads alloués au serveur. Même si il est possible d’augmenter le nombre de thread du serveur d’application, on ne peut pas le faire à l’infini et on ne peut que repousser le problème, pas l’éliminer.

L’implémentation réalisée dans Play permet de s’affranchir de cette barrière. Lors de la suspension de la requête, le thread est libéré automatiquement par le framework. Lorsque l’événement attendu survient, un thread est automatiquement réaffecté pour poursuivre la requête. Et c’est là que la magie opère : l’action reprend exactement à l’endroit où elle s’était arrêtée, de manière totalement transparente pour le développeur. Continue reading

Développement web , , ,

Utiliser Envers avec Play Framework

Ça fait un petit moment que je “joue” avec Play Framework (ok, elle était facile…) et ce que j’apprécie dans cet outil, c’est sa dualité.

Pour la majorité des besoins, on a tout ce qu’il faut sous la main et le framework est là pour nous faciliter la vie (pas besoin de définir les getters/setters, rechargement à chaud, serveur web intégré,…). On se retrouve alors très productif, à l’image de frameworks pur web comme symfony, RoR,…

Avec une telle productivité, ce qu’on oublierait presque, c’est qu’on est en train de faire du Java. Et si on fait du Java, ça veut dire qu’on a beaucoup beaucoup de librairies disponibles pour faire à peu près tout ce qu’on veut. C’est d’autant plus facile pour tout ce qui touche à l’accès aux données puisque Play repose sur JPA / Hibernate, La brique la plus utilisée dans ce domaine. Continue reading

Développement web , ,